
How to Detail a Car for a Showroom Shine at Home
- Oct 25
- 8 min read
Did you know that car owners who regularly detail their vehicles can increase their car’s resale value by up to 15 percent? Keeping your vehicle in pristine condition is more than about looks. A properly detailed car feels better to drive and can last longer, inside and out. Whether you want a stunning shine or to protect your investment, using the right techniques and tools makes all the difference from the very first wash to the final inspection.
Table of Contents
Quick Summary
Key Point | Explanation |
1. Assemble high-quality detailing tools | Invest in essential tools like microfiber towels, a clay bar, and polishing compounds for effective car detailing. |
2. Use a two-bucket wash method | This technique helps prevent scratches and thoroughly cleans the vehicle before decontamination. |
3. Apply poly and glaze for protection | Utilizing both glaze and sealant enhances paint gloss while protecting against environmental damage. |
4. Vacuum and condition the interior carefully | Thorough vacuuming and using appropriate conditioners create a clean and protected interior environment. |
5. Conduct a thorough final inspection | Review your work under different lighting to spot imperfections before considering the job complete. |
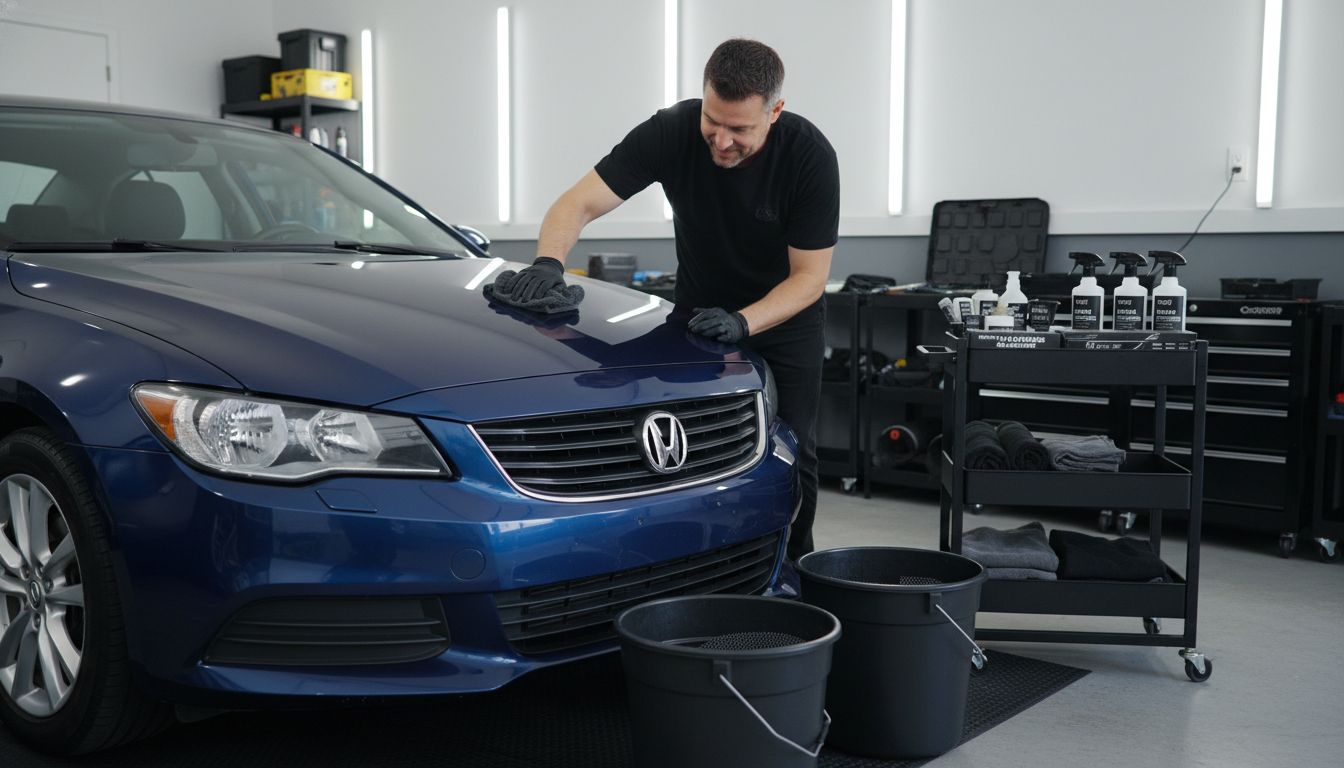
Step 1: Gather and Prepare Quality Detailing Tools
To achieve a professional showroom shine, you need the right automotive detailing tools at your disposal. This step involves selecting and preparing high-quality equipment that will transform your vehicle from dull to dazzling.
Start by assembling your essential toolkit. According to detailing research, key tools include a powerful vacuum cleaner for interior cleaning, multiple microfiber towels for drying and buffing, a clay bar for removing surface contaminants, and specialized polishing compounds for paint correction. Always Clean Detailing: Perfect Car Care recommends investing in quality tools that will make your detailing process smoother and more effective.
Your core toolkit should include:
Here’s a summary of essential detailing tools and their purposes:
Tool | Purpose | Pro Tip or Usage Note |
Microfiber towels | Washing Drying Buffing | Color code for different tasks |
Clay bar kit | Remove surface contaminants | Lubricate for smooth clay movement |
Car wash soap | Cleaning exterior | Use high-quality, pH-balanced soap |
Detailing brushes | Clean small/tight areas | Use various sizes for different spots |
Vacuum w/ attachments | Interior cleaning | Use crevice tool for tight spaces |
Polishing compounds | Paint correction | Select compound for paint condition |
Soft wash mitts | Gently clean exterior | Use separately for wheels/paint |
Bucket w/ grit guard | Minimize dirt transfer | Use two buckets for best results |
Multiple microfiber towels (at least 6-8)
Clay bar kit
Car wash soap
Detailing brushes
Vacuum with multiple attachments
Polishing compounds
Soft wash mitts
Bucket with grit guard
Pro tip: Color code your microfiber towels for different purposes. Use one color for washing, another for drying, and a third for applying wax or polish. This prevents cross-contamination and helps maintain your tools effectively.
By carefully selecting and preparing your detailing tools, you are setting the foundation for a professional-level car care experience. Next, we will dive into the precise techniques for using these tools to transform your vehicle’s appearance.
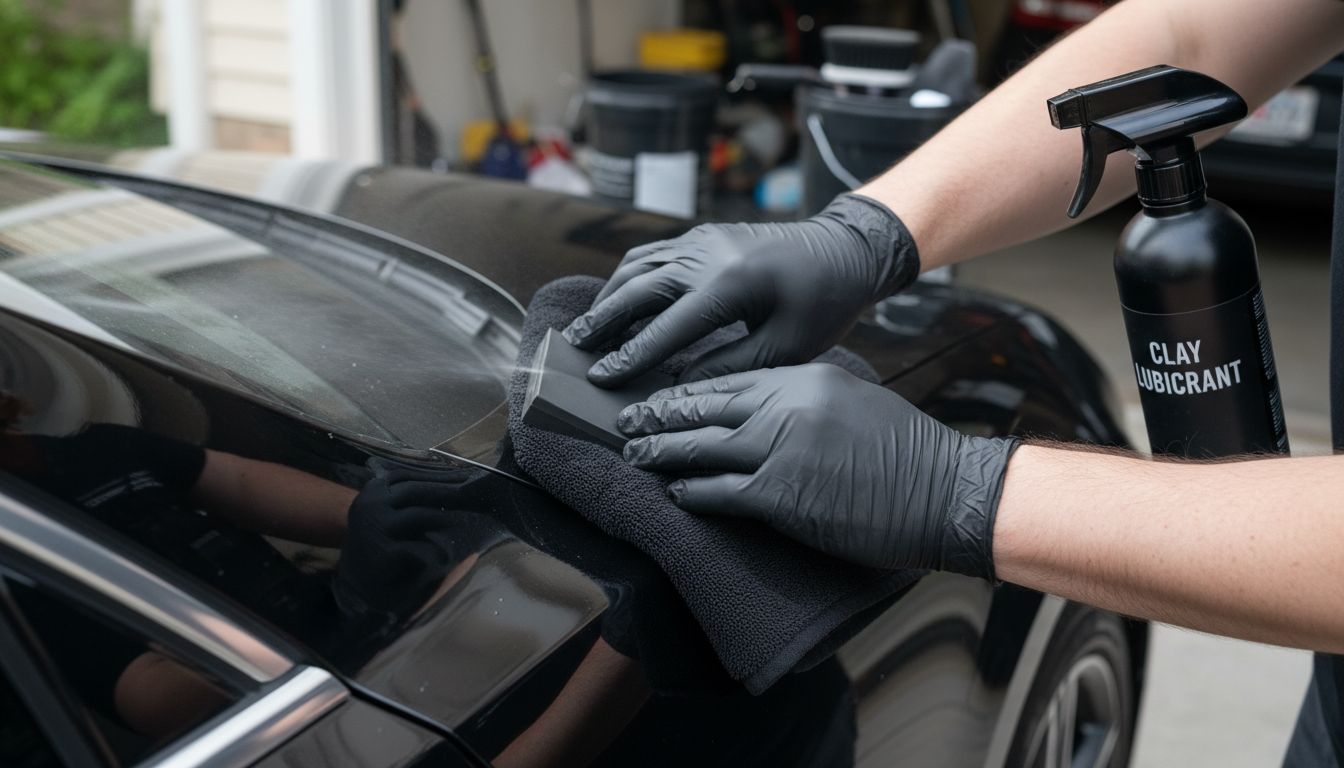
Step 2: Clean and Decontaminate the Exterior Surfaces
Now that you have your detailing tools ready, it is time to transform your vehicle’s exterior from grimy to gleaming. This crucial step involves thoroughly cleaning and removing embedded contaminants that standard washing cannot eliminate.
Begin with a comprehensive wash using a high-quality car wash soap. According to automotive detailing research, the initial washing removes surface dirt and prepares the paint for deeper decontamination. Exterior Detail (Paint Decontamination) experts recommend using a two bucket method to prevent scratching and ensure thorough cleaning.
After washing, the clay bar process becomes essential. As recommended by multiple automotive maintenance sources, a clay bar eliminates microscopic contaminants embedded in the paint surface. These might include industrial fallout, brake dust, and environmental particles that washing alone cannot remove.
Step by step clay bar technique:
Lubricate the surface with a clay bar lubricant
Gently glide the clay bar across small sections
Use light pressure and smooth motions
Fold and knead the clay bar to expose clean surfaces
Continue until the entire vehicle feels smooth
Warning: Always use a clean microfiber towel to dry the surface between steps and prevent potential scratching. Work in a shaded area to prevent soap and clay bar residue from drying too quickly.
By meticulously cleaning and decontaminating your vehicle’s exterior, you are preparing the perfect canvas for polishing and protection. Your car is now ready for the next transformative stage of detailing.
Step 3: Restore and Protect the Paint Finish
With your vehicle’s exterior cleaned and decontaminated, you are now ready to restore its paint to a showroom level shine. This critical stage involves polishing out imperfections and applying protective layers that will keep your car looking pristine for months to come.
Begin the restoration process with a high-quality polishing compound. According to automotive maintenance research, polishing removes minor scratches and enhances the paint’s overall gloss. SIGNATURE CERAMIC COATING professionals recommend using a dual action polisher for the most consistent and safe results.
Your polishing workflow should include:
Select the appropriate polishing pad for your paint condition
Apply a small amount of polishing compound
Work in small sections using moderate pressure
Use overlapping circular motions
Wipe away residue with a clean microfiber towel
After polishing, apply a protective layer. Research suggests using a combination of glaze and sealant to deepen the shine and protect against environmental damage. The glaze will enhance color depth while the sealant creates a protective barrier against UV rays, road grime, and potential contaminants.
Pro tip: Work in a cool shaded area and avoid direct sunlight during polishing and sealing to prevent uneven application and premature drying.
By meticulously restoring and protecting your paint finish, you have transformed your vehicle from an ordinary ride to a head turning masterpiece. Your car is now ready for the final detailing touches that will truly make it shine.
Step 4: Deep Clean and Condition the Interior
With your vehicle’s exterior gleaming, it is time to transform the interior into a spotless sanctuary. This comprehensive cleaning process will remove every trace of dirt, dust, and grime while protecting and preserving your car’s inner surfaces.
Begin with a thorough vacuuming using attachments that can reach every nook and cranny. Interior Detail (Interior clean Only) experts recommend starting from the top and working your way down to prevent recontaminating cleaned areas. Use specialized brushes to dislodge dirt from air vents, between seats, and in tight crevices where standard vacuuming cannot reach.
Your interior cleaning workflow should address different surfaces with targeted approaches:
Fabric seats and carpets require fabric cleaner and gentle agitation
Leather surfaces need a specific leather cleaner and conditioner
Plastic and vinyl surfaces benefit from all purpose interior cleaners
Use microfiber towels to prevent scratching delicate surfaces
Clean from top to bottom to catch falling debris
After cleaning, apply appropriate conditioners to protect and maintain different materials. Leather needs special conditioning to prevent cracking, while vinyl and plastic surfaces benefit from UV protectant treatments that prevent fading and aging.
Pro tip: Always test cleaning products on a small hidden area first to ensure they do not cause discoloration or damage to your specific interior surfaces.
By meticulously cleaning and conditioning your vehicle’s interior, you have completed the transformation from ordinary to extraordinary. Your car now looks and feels like it just rolled off the showroom floor.
Step 5: Inspect and Finalize Your Detailing Results
With every surface cleaned and protected, the final step is to meticulously inspect your vehicle and ensure a truly showroom worthy finish. This critical evaluation will help you identify and address any remaining imperfections that might have been overlooked during the detailing process.
Always Clean Detailing: Perfect Car Care professionals recommend conducting a comprehensive inspection under multiple lighting conditions. Natural daylight provides the most revealing environment for spotting missed areas or minor blemishes that indoor lighting might conceal.
Your final inspection checklist should include:
Examine exterior paint from multiple angles
Check for any remaining water spots or streaks
Inspect interior surfaces for residual dust or cleaning product remnants
Verify all windows and mirrors are crystal clear
Confirm trim and hard to reach areas are completely clean
Use different light sources strategically. Bright sunlight will reveal swirl marks or light scratches, while indoor lighting can help you spot subtle dust accumulations. Keep a microfiber towel and detailing spray nearby to address any final touchups immediately.
Pro tip: Take before and after photographs to document your impressive transformation. Not only will this provide personal satisfaction, but it also serves as a reference for future detailing sessions.
Congratulations. You have successfully transformed your vehicle from an ordinary car to a stunning showroom masterpiece through careful and methodical detailing.
Unlock a Showroom Shine with Expert Tools and Services
Detailing your car to achieve that perfect showroom glow at home can feel overwhelming without the right guidance and products. You have the goal to clean deeply, restore paint flawlessly, and protect every surface from dulling again. The struggle often lies in using the right tools like microfiber towels, clay bars, and polishing compounds correctly to avoid scratches or incomplete results. Our resources recognize these challenges and offer solutions that make professional-level detailing accessible.
Discover premium solutions for every step of your car care journey at Keep Clean ATX where quality meets convenience. Whether you need carefully curated products for Exterior Care or specialized options for Interior Care we have you covered. Start turning your vehicle into a stunning masterpiece right now with expert guidance and trusted products. Visit our site to shop the best tools or book a professional service that takes the hard work off your hands today.
Frequently Asked Questions
What are the essential tools needed to detail a car for a showroom shine at home?
To detail a car effectively, you need key tools such as microfiber towels, a clay bar kit, car wash soap, detailing brushes, a vacuum with attachments, polishing compounds, soft wash mitts, and a bucket with a grit guard. Assemble your toolkit before starting to ensure a smooth detailing process.
How do I properly clean and decontaminate my car’s exterior?
Start by washing your car thoroughly with high-quality car wash soap using the two-bucket method to minimize scratching. After washing, use a clay bar to remove embedded contaminants—lubricate the surface and glide the clay bar gently until the paint feels smooth.
What steps should I follow for polishing and protecting the car’s paint finish?
Begin polishing by applying a small amount of polishing compound with the appropriate pad, working in small sections using moderate pressure and circular motions. After polishing, apply a layer of glaze and sealant to enhance shine and protect against environmental damage.
How can I deep clean and condition the interior of my car?
Vacuum the interior thoroughly, starting from the top and working down to avoid re-contaminating cleaned areas. Use specific cleaners for fabric, leather, and plastic surfaces, and always apply conditioners to protect materials and prevent fading or cracking.
What should I inspect during the final detailing check?
Conduct a thorough inspection of your vehicle’s exterior and interior surfaces under various lighting conditions. Check for missed areas, streaks, and ensure all parts, including windows and mirrors, are crystal clear to confirm a showroom-worthy result.
How can I document my detailed car transformation?
Take before and after photographs of your vehicle during the detailing process to highlight the transformation. This not only provides personal satisfaction but also serves as a valuable reference for your future detailing sessions.
Recommended


Comments